With the net bars assembled, the next step for them will be paint. I've tried to keep with the color scheme given, so a medium gray sounds like it would fit quite nicely. the next step would be a template for cutting out the nets....and then the fabrication and application. I think this will be the finishing touch for the build, unless I think of anything else. some of the rigging presented it's own questions in my mind....like those two double block "guy lines" from the pilot house. my thoughts as for their use is probably for extra support for the main mast when the booms are in use. I could see where they tie off....the cheats on the pilot house's base, but where do they begin? I first tied a knot at the end of the thread and passed it up through the outer hole of the lower block, but it didn't look good at all. past modeling experience with ships of the plastic persuasion led me to adopt a letter system for these blocks. single blocks with only one eyelet is an "A" block.....single blocks with an eyelet on both ends are "B" blocks.....double blocks with an eyelet on one end is a "C" block....and double blocks with an eyelet on both ends are called a "D" block. I got an idea.....I would make these "C" blocks into "D" blocks.
To do this, I had to flatten the end of the block, drill a hole in the center, and install an eyelet.
After this was done, I seized a line onto them, a start for the line. the lines followed their course through the double blocks, until they ended up at the base, to be tied off at the cleats.
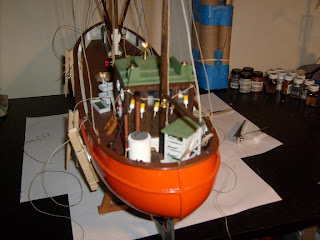
The stern of the ship was one of the areas that I was going to add a bit of detail. this is where the buoys came into play. the smaller ones were segmented on a piece of tan thread and span across the back of the pilot house. I would use the larger ones for the rope coils that I was to place in areas of the deck.
there is a rope coil on the starboard side that decided to come a little unraveled, so I had to re-glue it and use one of my tweezers to hold it down, until it dried. as you can see, the separator was next on the installation list.....it didn't end up where I wanted it exactly, but it still looks good.
the exhaust funnel had to be bracketed to the back of the pilot house.....I did it in the same fashion as the shrimp cooker funnel. the name placards went onto the stern as well.
I did the rest of the bow rigging. the ball was strung and the final one was strung soon after. they still need to be tied off and coiled.
The other rope coil was dry by this time, so that I could outfit it with the buoys......only three left.....where will they go? time will tell.
The final touch added to the Cux was the name placard on the bow. soon, the clothes pins will be gone, and the beauty of the Cux can shine, unfettered by obstructions.
What she is sitting on at the moment, is the template I started to draw for the nets. it was time to clear the table to make room for this step.....I will add these photos, only because I thought they were kind of cool to see. as I was cleaning the table, the Cux was put in the dinning room, out of harm's way. the collection of paints are a combination of the Cux and the Nordkap. I put some of them away, as well as tools that I won't need for the moment. the table got a good washing down to remove the dust and sawdust and soon, it was ready to bring the Cux back in. I don't know why.......call it a feeling I got, I looked at the closet, where I saw the newspaper cover that cloaked the Nordkap. "yepper......it's time you came out of the closet," I thought to myself, as I removed the newspaper from him. I took him out and placed him on the table, and then I brought in the Cux, placing her along his port. the scale difference is the first thing I noticed.....this is the first time these two ships are on the table together,,,,their builds being in different rooms.
I had attached a piece of shelving at the far end on my build table, along the wall. I thought it was a good place to berth him....for the time being. soon the Cux will be finished, and the build on the Nordkap can resume. AHOY!


